

Do you frequently have booths at large events? Do you want to target your competitor’s brick and mortar business? Learn how to run targeted Facebook ads only within a single building or city block.
Article Difficulty Level: Intermediate. Designed for people with a moderate grasp of the Facebook Ads Manager. This is the detailed walk-through I promised for the concepts outlined in my article about Geographic Microtargeting.
Facebook is a fantastic tool for reaching very specific audiences with very specific messages. The platform has transformed the advertising industry, giving us abilities that we’ve never before dreamed possible. However, if you ask the vast majority of Facebook ad “experts” if you can target people inside a specific building with targeted ads, they’ll give you a resounding “no.”
They are wrong.
Prominent Facebook Ad Expert Jon Loomer published a stellar and very detailed article on his blog his week on Location Targeting, written by a guy named Lucas Elliot. Generally speaking, I’d recommend Jon Loomer’s stuff to anyone looking to dive deep into the Facebook Ads Manager. However, in this particular article, the statement is made that “You can target very broad (as broad as the entire globe) or very specific (down to a one-mile radius of a pin drop) locations.” This is not technically correct.
The one-mile radius restriction is a common myth.
When creating an audience, you have a number of ways to narrow it geographically. I’d recommend reading the article on Jon Loomer’s blog that I linked to above for a full list of ways you can do this. I’ll only be going over what you need to know to target individual buildings. For what we are doing, we’ll need to know how to target individual addresses, then how to narrow our targeting beyond the 1-mile radius restriction. Let’s get started.
First, load Facebook on your desktop or laptop. This will not work on a tablet or smartphone – unless you specifically instruct your browser to load the desktop version of a page. Even then, most of this tutorial will be effectively impossible on a mobile device. Navigate to the drop down menu on the top right corner of the page. If you’ve never created ads in the Ads Manager before, you’ll see “Create Ads” as an option. If you have run Facebook ads before through the Ads Manager, you’ll have “Manage Ads” visible as well. Select whichever one is relevant to you.
Note: As mentioned at the beginning of this article, this is designed for people with an intermediate or higher level understanding of the Ads Manager. I’ll try to explain most steps as I go since I never know what any individual does or does not know, but there may be information you’ll have to figure out by yourself if you’ve never run a Facebook ad before.

This will take you to the Facebook Ads Manager.
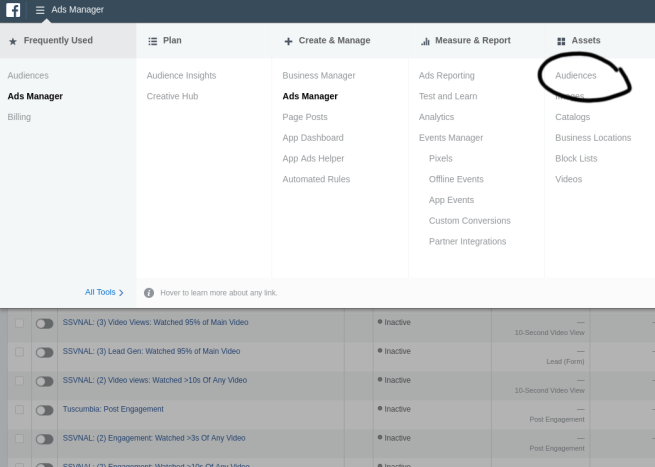
If you’ve never run ads before, you may need to provide Facebook some basic information at this point before you proceed. Once you’ve done that, or if you’ve run ads before, you will want to navigate to the Audiences section of your Ads Manager next. You can do this by clicking the three horizontal lines in the top left corner of your Ads Manager and navigating to “Audiences” in the menu that drops down.
Your Audience Manager should look like this (but empty if you haven’t used it before):
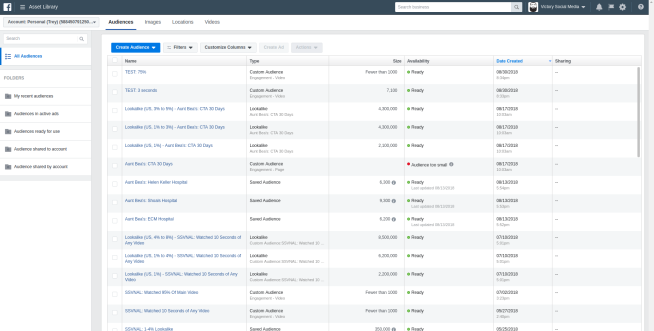
Oddly enough, once you navigate to the Audiences section, it will show up as “Asset Library” on the top left.
Now, let’s set up your audience. Click the blue “Create Audience” button. From the drop down, select “Saved Audience.”

Always create your audiences beforehand, no matter what strategy you are using. I strongly recommend against setting your audiences up when you create your ad. This allows for much easier editing of multiple ad sets using the same targeting, it allows you to stay much more organized, and it reduces the risk of accidentally deleting an Ad Set and losing your work. It also makes sure that Facebook has ample time to crunch the data it needs in order to have your audience ready when you need it.
For the purposes of this tutorial, I will only go over the Geographic section of this next screen. Facebook Audiences can be an entire college course in and off themselves, there are so many options. Facebook has an average of 10,000 data points on every user, and you can target most of them (well, until Interest Targeting was gutted last week). You can set the rest of your targeting to whatever you want, but I will caution that, using this technique, you will already be working with a very small audience, so narrowing it any further may make it hard for your ads to display.
Right now, you should be looking at this:
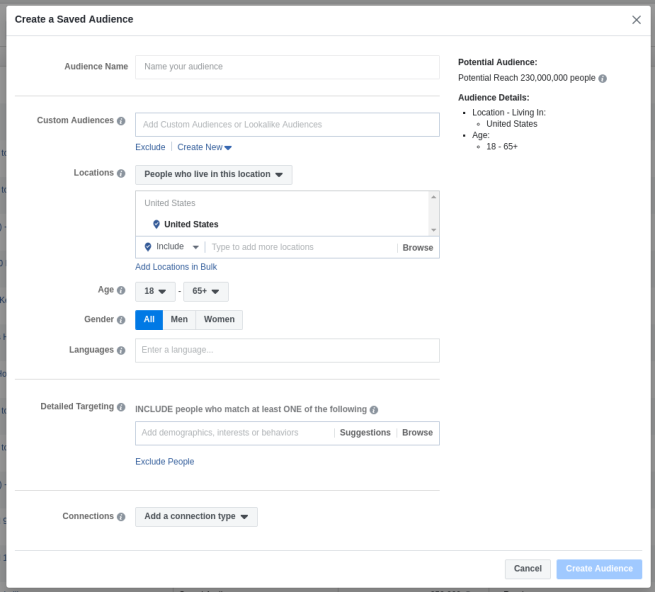
In the middle of the screen, you have a “Locations” box. First, change “People who live in this location” to “Everyone in this location.” Unless, of course, you are intentionally targeting a residential area for roofing ads or something like that.
Next, click your cursor in the box that says “Type to add more locations.” As soon as you do this, a map will appear, with the country you are currently in already highlighted.

If you know the address of where you are targeting – or even a nearby address, enter that into the box. That will zoom you into the area where we will be working. For my example, I will be using the Arthur Outlaw Convention Center in Mobile, Alabama, USA. I attended a convention here once and have actually targeted this facility before. So, I do a quick Google for the address, type it into the Locations box, and hit “Enter.” Once it has selected the location, hover over it in the box above and change the radius to the minimum of one mile.
This is what it should look like:

This strategy works best for buildings/facilities that are at least one city block in size. As mentioned in my article on Geographic Microtargeting, there is a margin of error here. It’s not perfect – but it’s a lot better than anything else out there. You may end up catching some people driving by on the road, but that’s life.
Zoom in until you can clearly tell where your building is. If the location pin placed by Facebook is in the middle of the building, great! You can skip this step. If it is not in the middle of the building, click “Drop Pin” and place it in the middle of the building. Adjust your radius to one mile. Then, hover over the first location in the box on top, and delete it. It should look like this:

Now we get to the fun part!
I said earlier that the one-mile minimum radius is a myth. Now you are about to find out what I meant. We are now going to shrink your radius down until it encompasses only the building you are trying to target. We are going to accomplish this using exclusion zones.
In my article about Geographic Microtargeting, I describe exclusion zones:
Exclusion zones are a not-as-well-known feature of Facebook’s geographic targeting. It’s not used very often. For most people, it’s really only useful when you’re targeting a radius around a city but want to exclude other states or cities that your radius might overlap, due to the phrasing in your copy.
Let’s get started.
Roughly measure the distance between your pin and the outside of your building. If you’re not good at eyeballing this, you can use a ruler on your screen. Move to the edge of your radius, and drop a new pin outside your existing radius that is the distance you just measured outside, and set the radius of the new pin to one mile.
Like this:
Now, set that new zone as an Exclusion Zone by either hovering over it in the top box and clicking the downwards-pointing arrow, or by clicking on the pin.
Like this:

Now, repeat this step. Set at least 4 exclusion radii around your original radius. I recommend setting around 8. Once you get used to this step, you can create fairly precise shapes around your buildings by adding in a bunch of exclusion radii. When you are done it should look like this:

Don’t be afraid to drop pins. You can always drop another one alongside it and delete the first one. There is no *reasonable* limit to the number of pins you can drop (I think it’ll cap you at 100).
Make sure you zoom in on your building and verify that the exclusion radii don’t overlap the building, but are close enough that they avoid any major highways as much as possible. You can easily spend 20-30 minutes on this step the first few times you set it up.
That’s the hard part! Name your audience, and save it.
Now, create your Campaign and Ad Set. In your Ad Set settings, you’ll select the Saved Audience that you created. Since I’m assuming you are familiar with the Ads Manager, I won’t go over creating ads, but this is how you select a Saved Audience:
VOILA!
A couple notes about content:
- This strategy allows you to use VERY specific content. Take advantage of that! If you’re at a convention, for instance, address the attendees directly. This will be very effective, trust me.
- Use video. This will make Retargeting and creating Lookalike Audiences MUCH easier and more effective in the future. Click the links above to read my articles on those topics.
That concludes this tutorial. What did you think? I’d love your feedback. Let me know how this works out for you! Post any questions you have in the comments of this article.
Don’t forget to subscribe to this blog for more awesome free content like this in the future!
FAQ:
Q1: “Facebook is telling me that the audience is too small for my ads to display. What do I do?
A1: Ignore Facebook. That’s a caution message, not an error message. It exists because 99.999% of ads being created this way are intended to target larger audiences, so they add that in there in case people accidentally narrow their audience too far. I’ve never had a problem pushing past this message, but if you do have an issue, comment on this article and I’ll see if I can’t diagnose your problem.
Q2: “My ads aren’t displaying! They are approved and my budget is high, but they aren’t running. What do I do?
A2: In my experience, these ads take a while to start running sometimes. Make sure you set up the Campaign and Ad Set that you intend on using well before you need it, and have content already submitted and approved before the event begins. If your ads still aren’t running, remove all additional narrowing criteria that you’ve added in the audience and see if that helps.
Q3: “My CPA (Cost Per Action) is high! What is happening?”
A3: It might be high. That’s fine. The goal is not to get cheap clicks or engagements. The objective here is to get highly relevant clicks and engagements. Don’t get too caught up in metrics, because these clicks are far more valuable than the ones you are used to getting.
I’ll add more FAQ questions to this article as time goes on – have a question? Ask it in the comments! If I get it more than once, I’ll add it and the answer to this post.
