Can You Run Facebook Video Ads In Sequence? Yes.

Sequenced video ads are an extremely powerful tool for education campaigns and high-dollar conversions, and are an extremely efficient way to run funnels.  You can show people one video ad until they watch it completely, then show them the next video in the sequence and ensure that they never see the first one again. It’s not simple, but it can be done. 

Article Difficulty Level: Advanced (Extremely!)

This post won’t include screenshots or tutorials. In this post, I’ll be explaining the concepts, then fleshing them out in a tutorial later – hopefully within a week or two.

Please note: As with all of my Advanced articles, I assume you have at least an intermediate-level understanding of the Facebook Ads Manager. 

Have you ever wanted to run video ads to an audience in sequence? There are many valuable uses for this. For example, if you’re trying to convert potential customers on a $1,000+ sale, you may want to show them an ordered series of informational posts, followed by FAQs, then some closing pitches. Or, maybe you’re working with a political organization or non-profit that wants to educate the public on an issue and is looking for an efficient way to do so. Or possibly, you’re just looking for a way to streamline your sales funnel and not waste money continuing to advertise to people that watch your main videos but never show any interest past your initial pitch.

Facebook ads are not necessarily designed to work this way, but the existing infrastructure can be manipulated in order to do so. When I say this, I mean that Facebook has not created any system for automating this. My hope is that they eventually will, but no current system exists (at least that I’m aware of).

“But Trey, what about ad sequencing?”

Ad sequencing on Facebook is not what I’m talking about here, let’s be clear. Ad sequencing shows people ads in a specific order. It cannot be tied to engagement or video views. What I’m talking about is showing someone one video after they’ve finished watching the previous video in your sequence.

Showing someone a series of ads doesn’t work. By my rough educated estimate, the average Facebook user sees over 150 ads per day. How many of those do you actually pay attention to? Very few. It is hard, if not difficult, to run an effective ad sequencing campaign that guarantees that people don’t see the following part of the sequence until they have completed viewing and understanding the previous part of the sequence.

I call this technique Manual Video Sequencing (MVS). Using MVS, you can run a video ad to your audience as many times as necessary until they finish watching Video 1, then run Video 2 to them as many times as it takes for them to watch it before running Video 3 to them. At each stage of the process, you can choose to stop running one or any of your previous video sequence ads to them. So, you can keep running them through Video 3, 4, 5, etc while continuing to show them Video 1, or you can ensure that they are never shown a video preceding their current place in your sequence.

As I said, hopefully Facebook will eventually come out with a tool to automate this. If you are reading this and work at Facebook, maybe you’ll pass this along to the right people. Who knows.

Okay, let’s get to work.

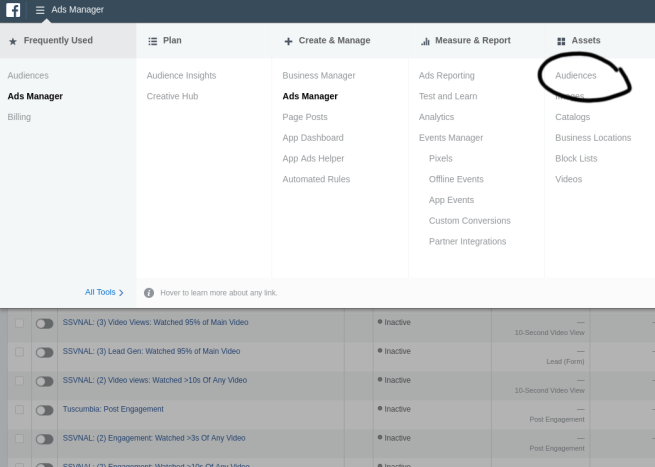
If you’ve read this far into this article, I assume you know what Custom Audiences are, and how they work. You can create a Custom Audience based on the amount of one or more of your specific videos that someone has watched. You can then use that Custom Audience to target people by inserting it into an Ad Set, adding it to a Saved Audience, or creating a Lookalike Audience.

To create a video sequence, you’ll need to upload every single video in your sequence into the Ads Manager. Go ahead and create all of your ads, leaving the targeting blank or randomly targeting a country. You’ll need to publish all the ads and immediately turn the campaigns off so they don’t run. This is because you can’t create a Custom Audience off of a video until you actually upload that video (duh). Even if the videos you’re using have already been uploaded, you’ll need to do it fresh, as your existing videos will already have views, causing those people to see them out of sequence once everything is up and running.

This is very important: You MUST create a NEW Ad Set for EACH video ad. This will not work at all if you put all videos in the same ad set, as you will have custom targeting settings for each video.

There are other ways to upload your videos for audience set up, but the above is the one I usually use. I’ll sometimes upload each ad, then create the next audience in the sequence and apply it one by one, but that’s a bit harder to walk you through if you aren’t already very familiar with the concept. Once you’ve done it for a while and gotten used to it, you may find that to be more efficient – and I’ll try to do a follow-up article at some point explaining the method.

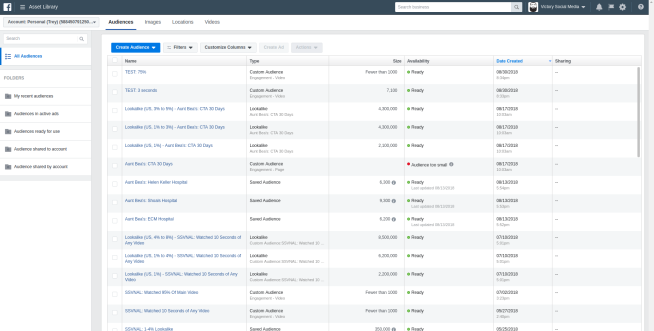
Now, you’ll need to create a Custom Audience for each of your videos. You’ll find this in the “Engagement” section if you’ve never used it before. You will be able to choose your percentage of video watched, and the video(s) you want to apply the criteria to. The percentage you use to move people to the next video in the sequence will vary depending on your objectives. I usually set the first video in the sequence at only 25%, to push people into the funnel easier. Once in your sequencing funnel, I usually only move people to the next stage after they’ve  watched 75-95% of the current video. This will obviously depend on your media and objectives. If you don’t have your CTA or critical info until the end of your video, you’ll need to set it at 95%.

Do this for each of your videos. I usually label them [VIDEONAME] – [%%]% vv, or “Video 1 – 75% vv” – “vv” meaning “video views.”

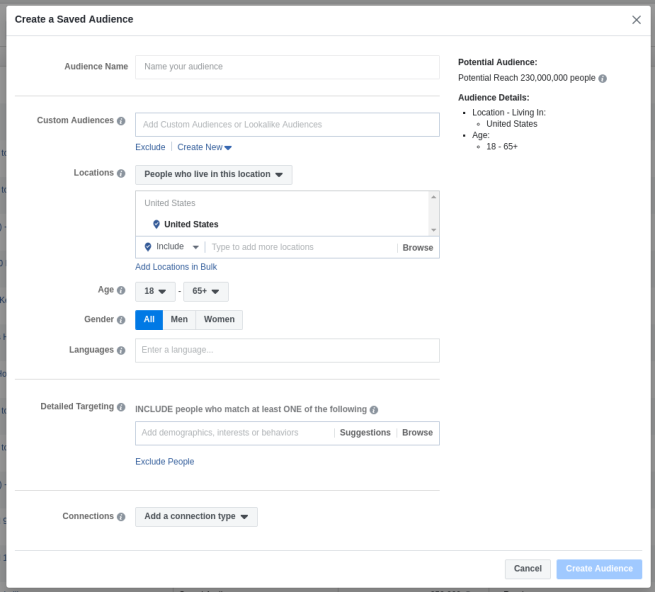
After this, you’ll want to go back into your ad sets that you’ve created. On Video 1, you’ll target your current audience – whoever that may be. No narrowing. On the ad set for Video 2, you’ll add two Custom Audiences. First, include “Video 1 – 25% vv,” if you used my labeling system. Then, EXCLUDE “Video 2 – 95% vv,” or whatever you set it to. This last step makes sure that they’ll stop seeing each video in the sequence after they’ve watched it. For Video 3, you’ll include “Video 2 – 95% vv” and EXCLUDE “Video 3 – 95%” and so on.

The end of your sequence will depend on your overall marketing objectives. In most cases, the setup will be the same, just without the exclusion audience.

Your overall setup will vary widely depending on your specific marketing goals and sales funnel. I highly recommend creating a mindmap and fleshing everything out before beginning – otherwise you’ll be far more error-prone, and the task will take far longer. I prefer the free version of SimpleMind for this.

If you read this and understood it, please leave me a comment with feedback and any questions you have. I’m going to work on creating a more detailed walk through, and it’ll be helpful to know what information I should add.

Thanks, and see you next time.

Disclaimer: You probably expect a sales pitch now. Nah. I’m just a nerd that likes writing. I hope you enjoy it.

The Negative Effects Of Engaging With Your Own Facebook Content (And The Impact On Long Term ROI)

Does liking your own Facebook page and/or posts increase your reach and help your marketing presence? Many “gurus” say it does. But if you are trying to build an effective marketing presence, it can actually hurt you in the long run.

Article Difficulty Level: Intermediate

One of the biggest “hacks” to increasing your organic Facebook reach has been around forever: “like” your own Facebook posts, and you’ll reach more people! It makes sense… or does it?

If you plan on ever possibly advertising on Facebook, this practice can cost you a lot of money in the long run.

In theory, here’s how it works: the Facebook algorithm ranks content higher that has more engagement. The earlier that engagement occurs, the more valuable it is. Therefore, a “like” right when you publish your post will give it a boost in the algorithm.

Early on, it made sense – and it usually worked. However, the tactic quickly became hotly debated. Many people that didn’t understand how the algorithm worked saw it as tacky and arrogant. Your name under your own post as a “like” may not seem odd to you, but it rubs a lot of people the wrong way. Because of the negative impression it gave out, many (or most) marketers ditched this tactic altogether.

Does the algorithmic benefit outweigh the damage done by coming across as a jerk? This has been a point of contention among social media marketers for years. On one side, some claim that any reach is good reach – while others insist that people will ultimately be less likely to engage with content that they see as unprofessional, lowering your engagement in the long run.
Based on the introduction to this post, you probably assume I side with the latter group. However, I oppose the “liking” of your own posts (and even your own Facebook Page) for entirely different reasons.

Before I go any further, I should specify that my advice is designed primarily for small and local business owners, like a gourmet bakery, or business owners with a larger geographic audience but a very narrow demographic one, like online jewelry sales.

That being said, let’s go ahead and get the two issues from above out of the way. What impact do these factors have in 2018? Some things to consider:


  1. The algorithm has grown up. As time has gone on, the Facebook news feed algorithm has become increasingly complex. Facebook has invested countless dollars into identifying and penalizing spammy behavior. While I have no direct evidence to support this, I personally believe based on my own experience that Facebook specifically negated the effect of your own interactions with your posts on the algorithm some time ago. This means (if true) that any engagement you make with your own posts is specifically banned from having any effect. This may or may not be the case, but at the end of the day, there’s no conclusive proof that it still works, either.
  1. You still look like a jerk. Even more so than years ago, liking your own post still comes across as a total dick move to anyone that doesn’t know why you’re doing it. It significantly impacts the quality of your post at a time when first impressions mean everything.


Now, let’s move on to the more technical (yet far more helpful) reasons why liking your own content is a bad idea. I’ll go a step farther: you shouldn’t even like your own Facebook Page… unless you are also part of your business’ target market. Why? Lookalike audiences.

As I’ve discussed elsewhere on this blog, Lookalike Audiences are currently the best method of reaching new people, hands down. Basically, a Lookalike Audience is equivalent to you telling Facebook, “Hey. See those people right there? Find me the 1% of the total population that is most similar to those people.” Lookalike audiences can be based on page likes, engagements, website visitors, video viewers, and more. Learn more about Lookalike Audiences here.

Facebook’s algorithm is extremely good with Lookalike Audiences. It accomplishes this by finding common denominators. With tens of thousands of data points on every user, this is easy for Facebook to do. Facebook looks at the audience you are starting with and sees what those people have in common. It then looks at the whole population and finds the people that have the most data points in common with your people.
This can save you thousands of dollars in research and testing. Even if you don’t know who your ideal customer is, Facebook can find out, with very little effort.

Here’s the problem, though. LLAs only work if your core audience is undiluted. If you want to create a lookalike audience based off of your current page likes but half of your followers are not your ideal customer, then it won’t work. Those people’s attributes will get thrown into the mix, and the Lookalike Audience won’t end up looking at all like your ideal customer. Your ads will be inefficient and costly.

Facebook ad marketers that are smart, experienced, and educated understand something: it takes time. The audiences you build when you first start out will be the basis for the audiences you’ll use all the way down the line. If you dilute your audience when you first create your page, you may never reach anything close to peak advertising efficiency. You’ll always have a relatively large subset of the people seeing your stuff that would never consider being your customers.

In a world where we are capable of only ever advertising to our potential customers, it makes no sense to waste money on anyone else. With a little patience and preparation, you can knock the socks off of your long term marketing presence.

So, back to the problem at hand. As I said earlier, unless you are in your page’s target audience, you should make sure you never like your page or any of your posts. Hopefully, that makes more sense now.
Here’s an example.

You own or are marketing a small gourmet bakery. Your ideal customer is 25-45 year old married women with at least one kid. You, however, are a 20 year old single male. If you launch your page with yourself as a like, and try to create a Lookalike Audience as soon as possible (at 100 page likes), your attributes will dilute the audience by 1%. The audience Facebook creates for you may now include some 20 year old men. That’s a gross oversimplification of how it works, but it illustrates the process.
1% may not seem like a lot, but it’s statistically significant – and if you can save 1% or more on your overall Facebook ad costs for the entire lifetime of your business just by not liking your own page, why wouldn’t you?

This brings up an important point: don’t invite all of your friends to like your page. More on this in a second.

I know what you’re probably thinking. If you can’t like your own page or invite anyone to like it that is outside your target audience, how do you grow?

Patience.

You can’t rush this. There used to be a time where you could quickly and effectively grow a business on Facebook, because all the customers were there but few of the businesses were. Now, you are competing for that attention with every other business owner out there. There is SO much content on Facebook, and only a limited number of posts can be seen by everyone each day. You need to have a long term plan early on, and practice patience.

Let’s talk numbers for a second.

A week after your page launch, if you’re a small business, 15 quality page fans is better than 150 you got from inviting everyone on your friends list. I’d rather have 100 page likes with 95+ of them in my target audience, than 10,000 page likes with 1,000 of them (10%) in my target audience. 1,000 may sound better than 95, but if you are ever hoping to use effective ad strategies for your page, it will hurt you a lot in the long run. If I wanted to grow that page with advertising, and only 1,000 of my 10,000 fans were in my target audience, I’d be wasting 90 cents or more of every dollar that I spent on ads to Lookalike Audiences. In fact, once a page becomes that diluted, it’ll be nearly impossible to recover. There are advanced tactics that can help out, but it’s expensive and time consuming.

Don’t get caught up with your page likes number. It doesn’t matter if your competition has ten times as many likes as you. If you’re doing it the right way and they aren’t, you’ll see far more return on your investment in the long run.

At the end of the day, likes that don’t (or never could) translate into dollars actually take dollars out of your pocket.

This is a common mistake many business owners make. There’s a right way and a wrong way to do giveaway contests… If your giveaway is pulling in page likes from people that are outside your target market, then you are hurting your business – not helping it. Make sure the prize and messaging will bring people in that are potential customers.

Think of it this way: every interaction by an actual potential customer on your page is $1/year in your pocket. Every interaction by someone who would never buy something from you is $1/year out of your pocket. With that in mind, constantly ask yourself whether or not what you’re doing on Facebook will make your total $/year go up or down.

Side note: everything said here applies to Instagram as well, as it is owned by Facebook and uses the same advertising platform.

Lookalike audiences are the most effective way to expand your business on Facebook. Don’t ruin them.

Questions or feedback? Comment below. I’ll try to respond when I get a chance.

Here’s where I make a sales pitch, right? Nah. I’m just a nerd that likes to write. You can’t hire me, I’m far too busy already.

Target Individual Buildings With Facebook Ads (Walk-Through)

Do you frequently have booths at large events? Do you want to target your competitor’s brick and mortar business? Learn how to run targeted Facebook ads only within a single building or city block. 

Article Difficulty Level: Intermediate. Designed for people with a moderate grasp of the Facebook Ads Manager. This is the detailed walk-through I promised for the concepts outlined in my article about Geographic Microtargeting.

Facebook is a fantastic tool for reaching very specific audiences with very specific messages. The platform has transformed the advertising industry, giving us abilities that we’ve never before dreamed possible. However, if you ask the vast majority of Facebook ad “experts” if you can target people inside a specific building with targeted ads, they’ll give you a resounding “no.”

They are wrong. 

Prominent Facebook Ad Expert Jon Loomer published a stellar and very detailed article on his blog his week on Location Targeting, written by a guy named Lucas Elliot. Generally speaking, I’d recommend Jon Loomer’s stuff to anyone looking to dive deep into the Facebook Ads Manager. However, in this particular article, the statement is made that “You can target very broad (as broad as the entire globe) or very specific (down to a one-mile radius of a pin drop) locations.” This is not technically correct.

The one-mile radius restriction is a common myth. 

When creating an audience, you have a number of ways to narrow it geographically. I’d recommend reading the article on Jon Loomer’s blog that I linked to above for a full list of ways you can do this. I’ll only be going over what you need to know to target individual buildings. For what we are doing, we’ll need to know how to target individual addresses, then how to narrow our targeting beyond the 1-mile radius restriction. Let’s get started.

First, load Facebook on your desktop or laptop. This will not work on a tablet or smartphone – unless you specifically instruct your browser to load the desktop version of a page. Even then, most of this tutorial will be effectively impossible on a mobile device. Navigate to the drop down menu on the top right corner of the page. If you’ve never created ads in the Ads Manager before, you’ll see “Create Ads” as an option. If you have run Facebook ads before through the Ads Manager, you’ll have “Manage Ads” visible as well. Select whichever one is relevant to you.

Note: As mentioned at the beginning of this article, this is designed for people with an intermediate or higher level understanding of the Ads Manager. I’ll try to explain most steps as I go since I never know what any individual does or does not know, but there may be information you’ll have to figure out by yourself if you’ve never run a Facebook ad before. 

(3) Facebook - Edited


This will take you to the Facebook Ads Manager.

If you’ve never run ads before, you may need to provide Facebook some basic information at this point before you proceed. Once you’ve done that, or if you’ve run ads before, you will want to navigate to the Audiences section of your Ads Manager next. You can do this by clicking the three horizontal lines in the top left corner of your Ads Manager and navigating to “Audiences” in the menu that drops down.

Screenshot from 2018-08-31 19-18-27

Your Audience Manager should look like this (but empty if you haven’t used it before):

Screenshot from 2018-08-31 19-21-10

Oddly enough, once you navigate to the Audiences section, it will show up as “Asset Library” on the top left. 

Now, let’s set up your audience. Click the blue “Create Audience” button. From the drop down, select “Saved Audience.”

Screenshot from 2018-08-31 19-24-05

Always create your audiences beforehand, no matter what strategy you are using. I strongly recommend against setting your audiences up when you create your ad. This allows for much easier editing of multiple ad sets using the same targeting, it allows you to stay much more organized, and it reduces the risk of accidentally deleting an Ad Set and losing your work. It also makes sure that Facebook has ample time to crunch the data it needs in order to have your audience ready when you need it.

For the purposes of this tutorial, I will only go over the Geographic section of this next screen. Facebook Audiences can be an entire college course in and off themselves, there are so many options. Facebook has an average of 10,000 data points on every user, and you can target most of them (well, until Interest Targeting was gutted last week). You can set the rest of your targeting to whatever you want, but I will caution that, using this technique, you will already be working with a very small audience, so narrowing it any further may make it hard for your ads to display.

Right now, you should be looking at this:

Screenshot from 2018-08-31 19-35-48

In the middle of the screen, you have a “Locations” box. First, change “People who live in this location” to “Everyone in this location.” Unless, of course, you are intentionally targeting a residential area for roofing ads or something like that.

Next, click your cursor in the box that says “Type to add more locations.” As soon as you do this, a map will appear, with the country you are currently in already highlighted.

Asset Library - Edited (6)

If you know the address of where you are targeting – or even a nearby address, enter that into the box. That will zoom you into the area where we will be working. For my example, I will be using the Arthur Outlaw Convention Center in Mobile, Alabama, USA. I attended a convention here once and have actually targeted this facility before. So, I do a quick Google for the address, type it into the Locations box, and hit “Enter.” Once it has selected the location, hover over it in the box above and change the radius to the minimum of one mile.

This is what it should look like:

Asset Library - Edited - Edited

This strategy works best for buildings/facilities that are at least one city block in size. As mentioned in my article on Geographic Microtargeting, there is a margin of error here. It’s not perfect – but it’s a lot better than anything else out there. You may end up catching some people driving by on the road, but that’s life.

Zoom in until you can clearly tell where your building is. If the location pin placed by Facebook is in the middle of the building, great! You can skip this step. If it is not in the middle of the building, click “Drop Pin” and place it in the middle of the building. Adjust your radius to one mile. Then, hover over the first location in the box on top, and delete it. It should look like this:

Asset Library - Edited.gif

Now we get to the fun part! 

I said earlier that the one-mile minimum radius is a myth. Now you are about to find out what I meant. We are now going to shrink your radius down until it encompasses only the building you are trying to target. We are going to accomplish this using exclusion zones.

In my article about Geographic Microtargeting, I describe exclusion zones:

Exclusion zones are a not-as-well-known feature of Facebook’s geographic targeting. It’s not used very often. For most people, it’s really only useful when you’re targeting a radius around a city but want to exclude other states or cities that your radius might overlap, due to the phrasing in your copy.

Let’s get started. 

Roughly measure the distance between your pin and the outside of your building. If you’re not good at eyeballing this, you can use a ruler on your screen. Move to the edge of your radius, and drop a new pin outside your existing radius that is the distance you just measured outside, and set the radius of the new pin to one mile.

Like this:

Asset Library - Edited (1)

Now, set that new zone as an Exclusion Zone by either hovering over it in the top box and clicking the downwards-pointing arrow, or by clicking on the pin.

Like this:

Asset Library - Edited (4)

Now, repeat this step. Set at least 4 exclusion radii around your original radius. I recommend setting around 8. Once you get used to this step, you can create fairly precise shapes around your buildings by adding in a bunch of exclusion radii. When you are done it should look like this:

Screenshot from 2018-08-31 20-26-41

Don’t be afraid to drop pins. You can always drop another one alongside it and delete the first one. There is no *reasonable* limit to the number of pins you can drop (I think it’ll cap you at 100).

Make sure you zoom in on your building and verify that the exclusion radii don’t overlap the building, but are close enough that they avoid any major highways as much as possible. You can easily spend 20-30 minutes on this step the first few times you set it up.

That’s the hard part! Name your audience, and save it.

Now, create your Campaign and Ad Set. In your Ad Set settings, you’ll select the Saved Audience that you created. Since I’m assuming you are familiar with the Ads Manager, I won’t go over creating ads, but this is how you select a Saved Audience:

Ads Manager - Creation - Edited

VOILA!

A couple notes about content:

  1. This strategy allows you to use VERY specific content. Take advantage of that! If you’re at a convention, for instance, address the attendees directly. This will be very effective, trust me.
  2. Use video. This will make Retargeting and creating Lookalike Audiences MUCH easier and more effective in the future. Click the links above to read my articles on those topics.

That concludes this tutorial. What did you think? I’d love your feedback. Let me know how this works out for you! Post any questions you have in the comments of this article.

Don’t forget to subscribe to this blog for more awesome free content like this in the future!

FAQ:

Q1: “Facebook is telling me that the audience is too small for my ads to display. What do I do?

A1: Ignore Facebook. That’s a caution message, not an error message. It exists because 99.999% of ads being created this way are intended to target larger audiences, so they add that in there in case people accidentally narrow their audience too far. I’ve never had a problem pushing past this message, but if you do have an issue, comment on this article and I’ll see if I can’t diagnose your problem.

Q2: “My ads aren’t displaying! They are approved and my budget is high, but they aren’t running. What do I do?

A2: In my experience, these ads take a while to start running sometimes. Make sure you set up the Campaign and Ad Set that you intend on using well before you need it, and have content already submitted and approved before the event begins. If your ads still aren’t running, remove all additional narrowing criteria that you’ve added in the audience and see if that helps.

Q3: “My CPA (Cost Per Action) is high! What is happening?”

A3: It might be high. That’s fine. The goal is not to get cheap clicks or engagements. The objective here is to get highly relevant clicks and engagements. Don’t get too caught up in metrics, because these clicks are far more valuable than the ones you are used to getting.

I’ll add more FAQ questions to this article as time goes on – have a question? Ask it in the comments! If I get it more than once, I’ll add it and the answer to this post. 

Principles Of Facebook Retargeting

“Retargeting” is the buzzword in social media right now, but what does it really mean? Is it hard to retarget people on Facebook? No, it’s (relatively) easy and effective – I’ll explain.

Article Difficulty Level – Beginner

Retargeting, simply defined, is the concept of displaying ads to people that have already seen or engaged with your ads before. For advanced users, it is the art of displaying specific ads to specific people who have viewed or engaged with your ads in a specific manner.

Ads on Facebook can be targeted in numerous ways, such as Interest Targeting (which was gutted this week), Lookalike Audiences, or Geographic Microtargeting. Each of these methods has their own unique usefulness and effectiveness, but each of them also have their flaws. The main flaw in each of these is that no matter how precise you set your targeting, you’ll always reach people that you aren’t intending to reach. This lowers your Click Through Rate (CTR) and raises your Cost Per Mille/Cost Per Thousand Impressions (CPM). This is why so much time and resources are devoted towards making these tactics as efficient as possible by the big multi-million dollar corporations and marketing agencies.

Retargeting solves this inaccuracy. By only targeting people who have already indicated an interest in your content, you can potentially raise your ad efficiency by a significant margin. But efficiency isn’t the only benefit of Retargeting.

Retargeting lets you run highly relevant ads to highly relevant audiences. Since you can actually run specific ads to people that have engaged with specific pieces of content in specific ways, you can write your copy very specifically. Sounds specific, doesn’t it? With most ads, you have to write your copy to appeal to everyone in your target audience – using very general language. With retargeted ads, you can speak directly to people, mentioning the specific actions they’ve taken in order to see that ad, or referencing specific things you know they’ve seen or done that put them in your targeting. You have to be careful not to be too specific, though, because Facebook will sometimes frown on that. Given the recent scrutiny, they don’t always like advertising to people just how specifically they are being targeted.

Retargeting also lets you capture valuable people and follow them around. If you know for an absolute, irrefutable fact that someone is in your target audience and is a likely customer, then you want to be in front of them every single day. With retargeting, you can capture people and put them in a totally separate targeting bucket with a separate budget and separate set of ad copy to ensure that your brand is in front of them consistently.

FOR EXAMPLE: Imagine you have a booth at a convention in Alabama. You’re selling, let’s say, vending equipment to elementary school principals. You’re at a convention center where 3,000 of those principals will be at over the next week. You’ve used my Geographic Microtargeting (GMT) tactics to set up a Saved Audience targeting everyone that is physically at that event. You snap a quick video of you standing in front of your booth: “Hey, y’all! I’m so excited to be at the Arthur Outlaw Convention Center here in Mobile* with you guys. If you’re in the main convention room for the sessions today, just take a right when you leave out the main door. I’m at booth #334, about halfway down on your left. I’m giving away FREE vending machines to help with your school fundraising, so come on by and ask me about that. Hope to talk to you soon!”

*This actually happened to me. I did this. It’s a real-world example. 

Video gives you the most retargeting options on Facebook. You can actually send specific ads to people that have not only watched specific videos of yours, but you can filter it by how much of that video they have watched. It’s quite incredible. With Geographic Microtargeting, you’ve narrowed your audience. With Lookalike Audiences, you can expand that audience. But with Retargeting, now you can attack that audience. If Interest Targeting is a shotgun, Lookalike Audiences are a biological weapon, Geographic Microtargeting is a nuke, and Retargeting… is a sniper rifle. Does that make sense? Since you’ve used GMT to narrow down your audience to only people physically inside the building, you are able to use the very specific text and language in the example above that forces them to stop, watch, read, and listen.  Once they’ve watched 3 seconds of your video, you’ve got them. Now, you can retarget them.

The convention is over. What happens? They keep seeing your ads! As soon as you close up shop and get back home, you hop on your desktop and set up your Retargeting. You create a Custom Audience targeting people that have watched 3 seconds of your video but less than 50% (I’ll write a post explaining how to do this in the future), and start running an ad to them: “Did we miss each other at the principal’s convention? I was the booth with the vending machines. In case you thought I was selling anything – I’m not! Our machines are totally free, and we do all the work every month.”

Because they engaged with your content in a specific way, you are able to run more specific content to them. Imagine how much more likely a principal that attended that conference is to stop and read your new ad versus a generic one targeting all principals in Alabama. Your click-through rate will skyrocket! This is great for lead generation, but it also has massive implications for e-commerce and other industries. I can see the wheels turning in your head right now… you’re excited at the potential, aren’t you?

The potential is limitless. Facebook allows you to retarget people using a wide variety of criteria. You can use video views, which are my favorite for building an audience in conjunction with GMT strategies. Or, you can upload an e-mail subscriber list. Or you can use a Pixel – a plug-in that Facebook has for your website that’ll track people on your site and let you retarget them. And that’s where it gets REALLY cool….

You can actually retarget people on Facebook based on specific actions that they take on your website. If someone adds an item to their cart but doesn’t check out, you can send them an ad reminding them to go check out. You can send people ads for specific products based on products they’ve already looked at on your website. And, since I know you are wondering… yes, THAT’S how Amazon does that. If you’ve ever gotten product ads for a site you’ve visited, and the products actually seem relevant to your browsing history – they are using Pixel retargeting.

Pixel retargeting is extremely complicated. You could literally take a college course on the topic and still not know everything. I’ll be the first to admit that I don’t know everything about it. There are e-commerce specialists out there that could run circles around me. Cat Howell has some fantastic courses and resources on this topic, as does Jon Loomer. I may develop my own some day, if I have the time and money. If you’re interested in learning more about this, or are struggling with implementing it, I’d recommend joining Facebook Ad Hacks or becoming a Patreon of this site.

I don’t have the space here to walk you through every part of Facebook retargeting. I wish I did. I wanted to talk about the basic principles behind it though, and stress how effective it can be. I’ll continue to write more on the topic in future days, so make sure you subscribe to this blog and follow me on Facebook if you don’t already. At the beginning of all of my posts on here, I like to state the difficulty level, so that people can spend time with the content most helpful to where they are at in life. Since this is a beginner-level article, I’ve tried to sheer away from getting too detailed. If you have specific questions though, feel free to ask – either in the comments section of wherever you saw this post shared (if I’m there), or in the comments on this blog article.

I sincerely hope this article has helped you. I’d appreciate any feedback you have, as always. Thanks for getting nerdy with me!

Always remember: Analyze, Test, Optimize, Implement. The strategy for success, on Facebook, and in the rest of life.